Creating Excellence in Interiorscaping
with One Minute Maintenance
Attendees at my workshops have regularly seen me demonstrate maintenance tips designed to allow a trained professional to service plant after plant, spending no more than one minute on each plant. While I'm sure it sounds very desirable to service plants this quickly, to understand how it's possible it is necessary to start at the very beginning, when first ordering the plants.
1. Buy plants with well-developed roots. The simple fact is that everyone assumes they're buying plants with roots, until they're in a jam and need emergency replacements for one of their fussiest clients, and the nursery warns that they're not quite done growing yet. Or, the plants that are normally ready to ship in February have been set back a month (or two) by an unseasonably cold growing season. No one intends to sell plants with under-developed roots, but it does happen, particularly during the winter months, when root growth slows down dramatically due to the cooler weather. Be a picky buyer, the company you save may be your own!
A wise buyer takes the plant out of its pot upon arrival, makes sure it has a fully developed root system, and that the roots are firm and healthy. On a healthy plant, the roots encircle and hold the soil mass together, so that it doesn't disintegrate while being slid out of its pot. This solves a multitude of future problems on the accounts. First of all, a plant without a healthy root system won't survive two months on the account, so the first step saves us the frustrating (and expensive) job of replacing the same plant twice. The effect of this maneuver on the customer, as he watches us replace the same plant repeatedly, is to make him wonder why he's paying us, because anyone can replace plants every two months--even him.
2. Remove the top 1-2" of soil and all remaining fertilizer pellets from the plant's root ball. Again, this solves many future problems on accounts. First, if there are fungus gnats present, their eggs and larvae are most likely in the top inch of the soilless media used by Florida nurseries, feeding specifically on the fungus that decomposes any bark or wood product which may be in the mix. Removing the top inch or two of soil eliminates most of the gnat problem. Perfectionists also remove the medium around the drainage holes of the nursery container, because in Florida, fungus gnats can also lay eggs here. Soil replacement at the bottom and the top of the plant is only done with barkless (and wood-free) media, to eliminate the gnats' food source.
Removal of the fertilizer pellets helps protect root health while a plant is becoming adjusted to its new home. There is no guarantee that the fertilizer from slow release pellets has all been released or used during the plant's production phase. Any fertilizer still present becomes concentrated as the soil begins to dry out between waterings, and will burn off the almost invisible, single cell thickness of a plant's root hairs, and open the more visible roots to root rot. The importance of this loss is that 80% of a plant's ability to take up water is gone with the root hairs, and soon after, a corresponding 80% of the plant's foliage will also be shed. This is the single most important reason replacement plants need replacement again within their first two months on an account--because by that time it will have lost 80% of its foliage, and looks like the plant it just replaced. This is as frustrating to our clients as it is to the service technician, and can be avoided by buying from nurseries that use liquid fertilizer on their Interiorscape plants.
3. Meticulously clean foliage. I'm assuming that no one is buying plants any longer that arrive
corroded with lime and pesticide deposits, so that this step is just
slightly more rigorous than the regular cleaning done on
 account.
Hand cleaning the foliage not only gives the plant a professional
appearance, it also allows for thorough inspection of all leaf and stem
surfaces. If there is an insect problem on the plant when it arrives,
it's better to find it now, as it will only get worse on the account.
Hand cleaning with soap and water not only allows for careful inspection
of any problem, but also a determination of the remedy. Badly infested
plants can be photographed and their purchase refused within 24 hours of
the plant's arrival. Any pesky critter's eggs that may be present, but
unseen on the plant, have a good chance of being dislodged and
eliminated during the washing process. Hand wiping a plant with soap
and water is a cost-effective way of achieving a clean, naturally shiny
leaf, without the clogged leaf pores or burning danger of many
commercial leaf cleaners (clean plants are naturally shiny, leaf-shined
plants are not necessarily clean).
account.
Hand cleaning the foliage not only gives the plant a professional
appearance, it also allows for thorough inspection of all leaf and stem
surfaces. If there is an insect problem on the plant when it arrives,
it's better to find it now, as it will only get worse on the account.
Hand cleaning with soap and water not only allows for careful inspection
of any problem, but also a determination of the remedy. Badly infested
plants can be photographed and their purchase refused within 24 hours of
the plant's arrival. Any pesky critter's eggs that may be present, but
unseen on the plant, have a good chance of being dislodged and
eliminated during the washing process. Hand wiping a plant with soap
and water is a cost-effective way of achieving a clean, naturally shiny
leaf, without the clogged leaf pores or burning danger of many
commercial leaf cleaners (clean plants are naturally shiny, leaf-shined
plants are not necessarily clean).
4. Install plants in controlled watering inserts (CWI), using a wood and bark free medium. This is done most easily after steps 1 and 2, and eliminates most of the problems mentioned therein. Since the soil surface never becomes moist in a CWI, new fungus gnats aren't attracted to the plants to lay their eggs. Also, any excess fertilizer salts are lifted to the top of the moisture zone in the root ball, away from the root hairs, while the root zone is kept adequately moist. Since the roots of the plants never dry out, the salts don't become concentrated in the area of the root hairs, allowing the maintenance of continuous root and foliage health. A plant with a healthy root system in a CWI will not be showing the brown leaf tips that are so indicative of root or watering problems on other plants. Many wholesalers and growers are already planting their foliage plants directly into controlled watering inserts as a service to their interiorscape clients, a definite win/win solution.
When these first four steps are followed, most plants will still be on the average account five years later, as opposed to when the steps aren't followed, and the plants rotate out every two months. Doing the first steps correctly is necessary to be able to continually service plants at the rate of one minute per plant.
The remaining steps take place on the account, during regular maintenance visits. Servicing plants correctly is like a dance, complete with its own rhythm and steps. And just like a dance, the steps are done consecutively, in order, without skipping around or missing a beat. The following steps are followed on every plant on each account during every visit.
5. Rotate plant while looking for errant branches or leaves (5 seconds). Rotate plants from a quarter to a half turn, on each service visit. This allows for even growth of the plant, as well as viewing of the plant from all sides. What we're looking for here is the health and symmetry of the plant, and whether any part of the plant stands out as being either out of shape or unattractive. Older Spathiphyllum leaves will stand out if they've been trimmed, have yellow edges or brown spots on them. Certain branches on a Ficus or Br. actinophylla will stand out if they are long, floppy, or outside the desirable size and shape of the plant, and spotted Aglaonema or Dracaena leaves will stand out if they are yellow spotted or tipped with brown.
6. If it's ugly, cut it off!(5-15 seconds)
Prune off a long vine
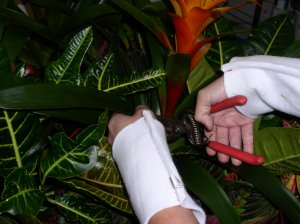 or
a branch outside the symmetry of the plant, pinch back the tallest shoot
of an Aglaonema, and remove the worst of the spotted or tipped
leaves. If this is done at the rate of one to three leaves per plant
each visit, all that will be noticeable is that the plant looks better.
If we cut off what's ugly, what's left will be less ugly. And
since pruning initiates new growth, all the customer will notice is the
plant putting out new leaves.
or
a branch outside the symmetry of the plant, pinch back the tallest shoot
of an Aglaonema, and remove the worst of the spotted or tipped
leaves. If this is done at the rate of one to three leaves per plant
each visit, all that will be noticeable is that the plant looks better.
If we cut off what's ugly, what's left will be less ugly. And
since pruning initiates new growth, all the customer will notice is the
plant putting out new leaves.
It should be obvious that if almost every leaf on a plant is marred, we don't remove them all at one time. This is where the rhythm of servicing plants at one minute per plant comes in handy. We don't have time to take off (or trim) every leaf. We have to make a judicious decision, and select the two or three worst (or, most obvious) leaves to be removed. If we have carefully removed all of the leaf stem, down to its base, the new growth will already be showing when we return for our next visit, and we can choose one or two more leaves for removal. (Remember, if the first four steps are followed, you will no longer be seeing plants with spots or brown tips on every leaf.)
7. Clean each plant on every visit.(5-15 seconds) I don't mean hand wipe each leaf, but I do mean put some attention into cleaning. Spending 5-15 seconds cleaning a plant on each visit will not only keep the plant clean and shiny, it will solve a multitude of problems that would otherwise crop up later. I use different cleaning techniques on different plants, according to their needs.
-
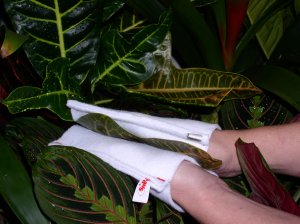
On broad leaves that are not necessarily prone to insects (Dr. 'Janet Craig', Spathiphyllum) I use Paws™ cleaning mitts that have been swished in soapy water, and wrung out tightly. The plants are then shiny, and the Paws create a static charge that actually repels dust from the leaves longer than any other cleaning aid I've used.
-
On plants that tend to be prone to insects (palms, Dr. marginata, ivy, Aglaonema, etc.) I spray soap and water, including whatever location is susceptible to bugs. On mite prone plants, I include the undersides of the leaves in the cleaning process, on mealybug prone plants, I include the leaf axils of the plants, and on ivy or pothos I finger-comb the vines to flip the leaves over backwards, while spraying soap and water. This is my total insect prevention technique, which only works if it is done religiously, every visit. If while I'm cleaning I see that a problem has already started, I will prune off the worst of the infestation, and continue washing thoroughly on each visit.
-
On plants in TOPsiders cleaning again depends on the type of plants being used. I use a combination of spraying soapy water, and wiping the Paws on my wrists across the foliage. The objective here is to keep the plants from becoming dusty, and discouraging insect infestations.
-
Ficus trees require a separate category, because they are rarely cleaned properly on accounts. On this plant, it's easiest to spray a small amount of soap on the tree's foliage, then wipe down entire branches of leaves with one cleaning mitt on the top and another on the bottom side of the branch. When finished, shake the tree to keep its branches flexible (clean up of any leaf sheaths that may drop is included in Step 9).
8. Check for moisture and fill (CWI) every two weeks (15 seconds). When approaching a plant to be serviced, check that the soil surface is still dry, as is normal with this system. If moist, it is usually because the stopper as not been inserted into its opening tightly enough to form a vacuum within the pot, so fill, and retighten. Filling the system every two weeks allows for pouring only half as much water as if it were being filled once a month, while allowing the plant to consistently receive water on demand. Since no water evaporates from the soil (90% of other plants' water is lost through evaporation), this means carrying less water less often. Remember that a dry top layer of soil is good, since there are no roots in it anyway, and dry soil doesn't attract fungus gnats.
If plants are not in a CWI, insert a soil probe down to the bottom of the pot, and add water after the top half (approximately) of the soil becomes dry. Water Spathiphyllum a little sooner, Dracaena, Yucca, Sanseveria and cactus species a little later. One can easily see the guesswork required to anticipate how much water will be necessary for a plant in future weeks, and why so many plants show the effects of moisture stress (too much or too little) when not in controlled watering inserts.
As a scheduling bonus, most CWI under normal office conditions (70 f.c. of light) can go at least a month before filling, so there's considerable leeway in making up service gaps due to vacation or sick time. However, if the plants are in a hot, sunny window, filling the controlled watering insert every two weeks is a must.
9. Remove debris from container, and fluff
and straighten moss (10 seconds). Since this is done every visit,
there is rarely much debris on the top of a floor planter, and the moss
doesn't get severely strung out between visits, this tends to be a
finishing touch, rather than a major project. The final part of this
step is running the pocket sweep over the carpet to pick up leaf
sheaths, and moss "crumbs", or wiping them off the floor tile with the
cleaning mitt on my wrist. 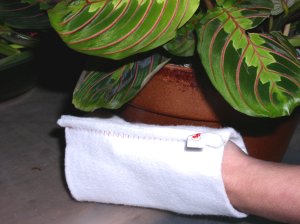
10. Wipe off container with Plant Paws™ (5 seconds). Since I'm already working on the container as I complete Step 9, I'm in the right place to buff any dust or dirt off the decorative container with the Plant Paws™ that are (always) on my wrists. And since I have rotated the plant, I only clean the part of the container that is showing during each visit.
Obviously, doing plant maintenance properly in a minute per plant takes as much practice as learning any new dance. It also makes a lot of assumptions, such as having all my equipment with me and in proper working condition, and having the proper training and experience to do the plant maintenance correctly.
Doing the first steps first is the most important part of being able to complete a service cycle in a minute per plant, yet it is my experience that not every company will actually complete all four steps. If your company is doing two of the first four steps, it's average. Completing three out of four is very good, and any company doing all four steps is able to do exceptional plant maintenance, profitably.
Anyone can spend less than a minute per plant, just by walking up to the plant, pouring water on it, and walking away. The real art to plant maintenance is to walk up to each plant and complete each of the remaining six steps on each visit, no matter what.

-Linnaea Newman
.gif)